26 Lens Management
26.1 Phaco-Vitrectomy
26.2 Pars Plana Lensectomy
26.3 Intraocular Lens Explantation
26.4 Secondary Intraocular Lens Insertion Clinical Scenarios & Clinical Decision Making
26.5 Sulcus Intraocular Lens
26.6 Anterior Chamber Intraocular Lens
26.7 Iris Fixated Intraocular Lenses
26.8.1 Scleral Sutured Intraocular Lens – Traditional 2 Point Fixation
26.8.2 Scleral Sutured Posterior Chamber Intraocular Lens 4 Point Fixation
26.8.3 Scleral Sutured Posterior Chamber Intraocular Lens – “Hoffman” Corneoscleral Pockets
26.8.4 Alternate Technique to Rescue a Dislocated IOL – Triangular Scleral Flap, Sutured IOL Technique
26.8.5 Suturing Without Exchanging the Intraocular Lens
26.9 Sutureless Scleral Fixation of an Intraocular Lens
26.8.1 Scleral Sutured Intraocular Lens - Traditional 2 Point Fixation
Scleral sutured lenses are an increasingly utilized IOL technique. Originally scleral flaps and prolene suture were favored with 2-point fixation. The latest fixation techniques use 4-point fixation and gore-tex suture, which is discussed in Chapter 26.8.2 Scleral Sutured PCIOL- 4 Point Fixation.
Opening
Time should be spent to plan the location of the sclerotomies, scleral sutures for the PC- IOL (180 opposite each other, usually at 3 and 9 o’clock or 1:30 o’clock and 7:30 o’clock) and wound for removal of the dislocated IOL and insertion of a new PC-IOL (if required, usually superior). The wound placement may be dictated by prior or future planned surgery (e.g. trabeculectomy, glaucoma drainage device or scleral buckle) and conjunctival mobility. If the superior conjunctiva needs to be preserved for a glaucoma bleb, the wound can be placed temporally. The infusion cannula should be placed well away from the site of the scleral sutures (e.g. 6 o’clock) to avoid tangling the suture around it.
If there has been recent complicated cataract surgery, check that the clear corneal incision has been adequately sutured.
If there has been a dropped nucleus, one (or more) of the sclerotomies may need to be enlarged to 20-gauge with an MVR blade to enable insertion of a fragmatome.
Begin by making localised conjunctival peritomies with the Westcott scissors and conjunctival forceps at the sites where the sutures will be passed. Scleral flaps or grooves will be made underneath this. A single large conjunctival peritomy can be created for both the scleral sutures and a scleral tunnel if this is required to remove or insert an IOL. Use external diathermy on the scleral bed to achieve haemostasis.
Regardless of the scenario, careful pars plana vitrectomy is the first step. Extra attention should be paid to clearing vitreous anteriorly where the PC-IOL will lie and where any scleral sutures will be tied. Depending on the circumstances, a standard pars plana vitrectomy may be undertaken prior to manipulating the IOL, or a more limited initial vitrectomy may be indicated if the IOL is precariously placed and fixation of a subluxed, rather than completely dislocated IOL is desired. Further vitreous clearance and completion of pars plana vitrectomy can be undertaken once the IOL has been secured in this context.
360 scleral depression inspecting for retinal breaks or detachment is often best performed at this time. Any breaks should be treated with endolaser.
If there is retained lens material it will need to be removed. Fine cortical material can often be removed with the vitrector cutter, but dense nuclear material will require removal with a fragmatome (see Chapter 26.2 Pars plana Lensectomy).
There are two traditional methods for this: scleral flaps or scleral grooves. Scleral flaps have the advantage of burying the sutures. The potential disadvantage is that the scleral bite will be insufficient, leading to late dislocation of the IOL as the suture erodes through sclera. Scleral grooves have the advantage of allowing a deeper scleral bite, but the sutures may become exposed causing irritation or endophthalmitis. Exposed sutures may be trimmed by argon suturelysis.
The scleral sutures should be placed 180 opposite each other. Lying a suture across the diameter of the cornea and marking the limbus can assist with positioning. This can also be achieved with a toric marker. Some surgeons prefer to place the sutures at 3 and 9 o’clock- this avoids interfering with the sclerostomies. Others prefer 1:30 o’clock and 7:30 o’clock- this makes it easier to pass the suture as it avoids the nose.
A. Scleral Flaps
Scleral flaps may be made either rectangular or triangular. To make triangular scleral flaps, one edge is made parallel with the limbus and the other edge 45º to this (in a “V” shape, with the apex of the triangle facing the surgeon superiorly). Ensure that the limbal edge is close to the limbus so that there is sufficient room for the scleral suture pass to remain under the flap (Figure 26.8.1.1 and Figure 26.8.1.2).
Fashion the edges of the partial thickness scleral flap with a No. 57 sclerotome or 15 degree blade (Figure 26.8.1.1), ensuring the incisions cross each other at the apex. Pick up the apex of the triangular flap with .12 forceps, and lamellar dissect out the scleral flap with a crescent blade (Figure 26.8.1.2). The scleral flap should only be thin enough to avoid tearing- a thick scleral flap leaves little scleral bed to suture to later. Perform further diathermy haemostasis if required.
B. Scleral Grooves
Scleral grooves may be made either single or double. Single grooves consist of radial partial scleral thickness incisions 180 opposite each other, fashioned with a No. 57 sclerotome or 15 degree blade. The groove extends from the limbus, approximately 3mm posteriorly. Double grooves involve two parallel grooves on each side, approximately 1.5mm apart.
C. Knotless Scleral Suture (Szurmann Z-Suture)
If there is a dislocated or subluxed IOL, determine the type and whether it is intact and salvageable. A one-piece foldable IOL cannot be sutured and will need to be removed.
Note
An intact three-piece or rigid (PMMA) one-piece IOL may be sutured to sclera without having to exchange it, obviating the need for a large wound
If an IOL needs to be removed, perform the vitrectomy first and construct the wound as the last step prior to removing the IOL. This avoids unnecessary hypotony during the vitrectomy. The size of the wound depends on the size of any IOL being explanted or implanted. Most non-foldable IOL’s have a 6.0mm optic diameter, and the wound will need to be made at least that size. Foldable IOL’s can often be removed/inserted through a smaller incision (e.g. 2.75mm), especially if first cut before explantation. Two options exist for wound construction:
A. Scleral Tunnel
Scleral tunnels have the advantage of reduced astigmatism and less leakage. However, they take more time and are more difficult to construct. A scleral tunnel may be the only option if there is a recent corneal graft. They are preferred by the author (Figure 26.8.1.3).
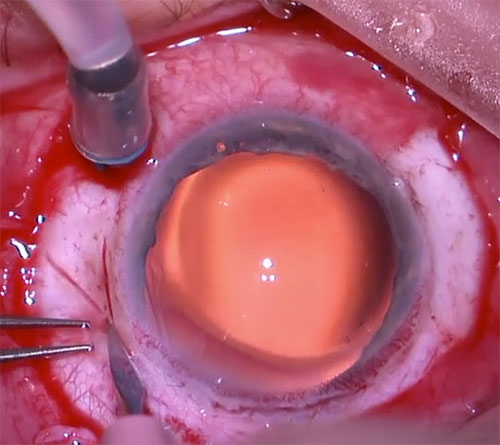
Begin by making a superior conjunctival peritomy with Westcott scissors and conjunctival forceps. Use external diathermy on the scleral bed to achieve haemostasis. Make a straight horizontal partial-thickness scleral incision 1.5mm posterior and parallel to the limbus (or a frown incision shape) with a No. 57 sclerotome or 15 degree blade. The width of the scleral tunnel depends on the size of the optic of the IOL to be sutured. 6.5-7.0mm is sufficient in most cases (a Bausch + Lomb P366UV IOL has an optic diameter of 6.5mm, an Alcon CZ70BD IOL has an optic diameter of 7.0mm). Using .12 forceps and a crescent blade, create a uniplanar lamellar scleral tunnel until the tip of the blade is visible through the corneal limbus. It is important to stay at the same depth between scleral lamellae, preferably reaching the limbus at mid-corneal depth. Use the crescent blade in a ‘rotating’ action, dissecting more anteriorly in the centre before the periphery. Using the crescent blade or a keratome, enter the anterior chamber centrally through the wound at a steeper angle than the first part of the wound to create a “stepped” incision. Take care not to enter too posteriorly, which may cause inadvertent iris trauma and hemorrhage. Extend the wound along its full extent, using the side of the keratome or crescent blade to cut. Try to keep the keratome intraocular until the wound has been completed- multiple passes tends to create false passages and uneven scleral tunnels. A well-constructed scleral tunnel should have no iris prolapse and minimal leakage, even without sutures.
B. Clear Corneal (Limbal) Incision
Clear corneal (limbal) incisions are made in a similar method to a scleral tunnel but at the limbus. Make a vertical partial-thickness corneal limbal incision with a No. 57 sclerotome or 15 degree blade. Using .12 forceps and a crescent blade, create a uniplanar lamellar corneal tunnel. Using the keratome, enter the anterior chamber centrally through the wound at a steeper angle, before opening it up to its full extent on each side.
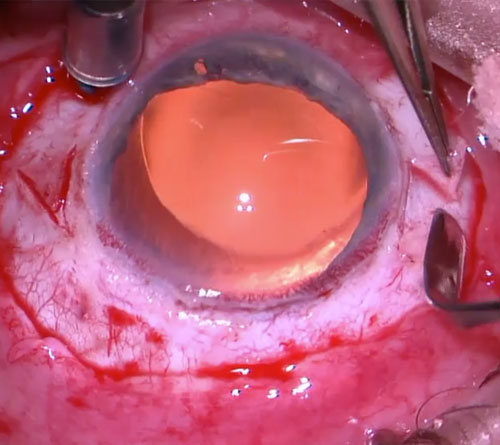
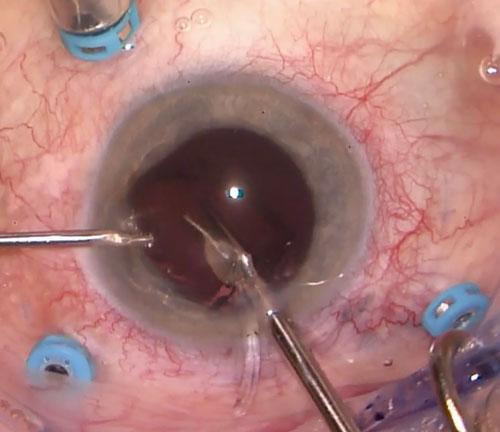
Removal of an IOL can be difficult. Fill the anterior chamber with viscoelastic to protect the corneal endothelium after the IOL has been brought up (Figure 26.8.1.4). After ensuring that the IOL is freely mobile and devoid of vitreous, pick it up with intraocular forceps (passed through a sclerotomy), taking care not to traumatise the underlying retina. It is usually easiest to pick it up by one of the haptics, or at the optic-haptic junction. Sometimes it is useful to balance the IOL on the light pipe at the optic-haptic junction to allow for re-grasping of the IOL.
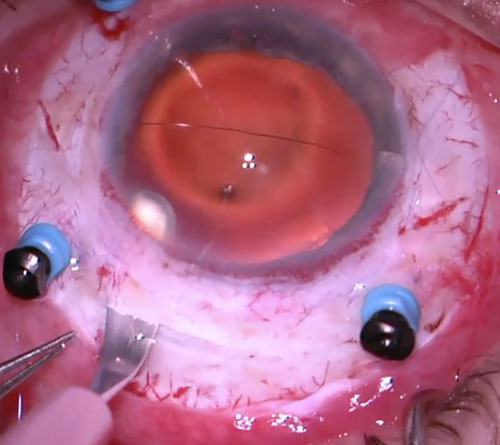
Bring the IOL up into the pupillary plane, re-inverting and lowering the microscope to focus on the anterior segment. Remove the light pipe whilst still holding onto the IOL with the intraocular forceps. Attempt to bring the IOL up through the pupil into the anterior chamber. If this cannot be performed in a single motion, capturing one of the haptics on the anterior surface of the iris may temporarily suffice. If the IOL needs to be explanted, it can first be safely cut in the anterior chamber (Figure 26.8.1.5). This is not possible for rigid PMMA IOLs, and not necessary if the IOL is to be retained for suturing or if the wound size has to be large for introduction of a rigid IOL.
Grasp the IOL in the anterior chamber through the wound with a second pair of intraocular forceps, Kelman-McPherson forceps, curved tying forceps or Sinskey hook to explant it from the eye.
Option
If intraocular forceps are not available, the vitrectomy cutter on aspiration can be used to elevate the dislocated IOL
Note
If a three-piece IOL is to be salvaged for scleral fixation, first place it in the anterior chamber. A micro-vitreoretinal (MVR) or 15 degree blade can be used to make a corneal paracentesis and a second pair of intraocular forceps or Sinskey hook passed through this to manipulate the IOL
In the non-dominant (e.g. left) hand pass a 27-gauge needle, bent 45 degrees, on 1.0ml (cc) syringe under the scleral flap (or through one of the scleral grooves) approximately 1.5-2.5mm posterior to the limbus until the tip is visible in the pupil. After entering the sclera, ensure that the pass is flat and directed just behind the iris (Figure 26.8.1.6).
In the dominant (e.g. right) hand pass one end (the straight needle) of the double armed 9-0 or 10-0 Prolene suture under the opposite scleral flap (or through one of the scleral grooves) approximately 1.5-2.5mm posterior to the limbus (more posterior if there is angle recession). Aim posteriorly- if the iris is seen to “tent”, the pass needs to be made more posteriorly. Manoeuvre the tip of the straight needle into the lumen of the opposite 27-gauge needle until it is inserted as far as possible. Avoid pushing the needle at its connection to the suture as this may break the suture. In most eyes the straight needle will be just long enough to exit the opposite side. Slowly withdraw the 27-gauge needle until the tip of the straight needle is visible and pull this all the way through until equal lengths of suture are present on opposite sides of the eye. In very large eyes when the straight needle cannot reach the opposite side, angle the 27-gauge needle slightly to “catch” the straight needle whilst exiting the eye. Carefully place the needles at the two ends of the Prolene suture in a visible position so that the suture will not be inadvertently caught or broken.
All rights reserved. No part of this publication which includes all images and diagrams may be reproduced, distributed, or transmitted in any form or by any means, including photocopying, recording, or other electronic or mechanical methods, without the prior written permission of the authors, except in the case of brief quotations embodied in critical reviews and certain other noncommercial uses permitted by copyright law.

Westmead Eye Manual
This invaluable open-source textbook for eye care professionals summarises the steps ophthalmologists need to perform when examining a patient.