26 Lens Management
26.1 Phaco-Vitrectomy
26.2 Pars Plana Lensectomy
26.3 Intraocular Lens Explantation
26.4 Secondary Intraocular Lens Insertion Clinical Scenarios & Clinical Decision Making
26.5 Sulcus Intraocular Lens
26.6 Anterior Chamber Intraocular Lens
26.7 Iris Fixated Intraocular Lenses
26.8.1 Scleral Sutured Intraocular Lens – Traditional 2 Point Fixation
26.8.2 Scleral Sutured Posterior Chamber Intraocular Lens 4 Point Fixation
26.8.3 Scleral Sutured Posterior Chamber Intraocular Lens – “Hoffman” Corneoscleral Pockets
26.8.4 Alternate Technique to Rescue a Dislocated IOL – Triangular Scleral Flap, Sutured IOL Technique
26.8.5 Suturing Without Exchanging the Intraocular Lens
26.9 Sutureless Scleral Fixation of an Intraocular Lens
26.8.2 Scleral Sutured Posterior Chamber Intraocular Lens Procedure – 4 Point Fixation
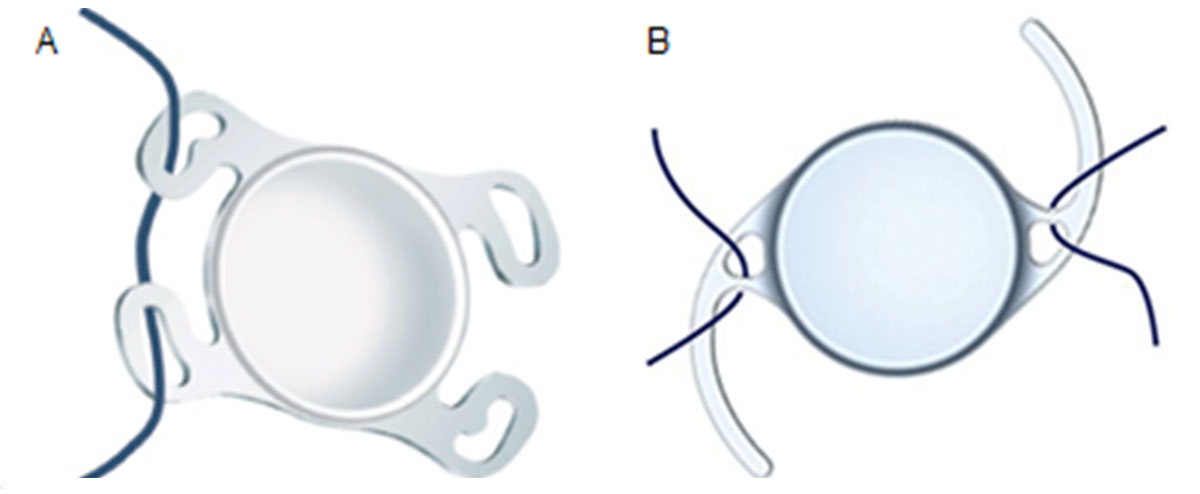
Posterior chamber intraocular lenses (PC-IOL) with eyelets may be sutured to the sclera to enable a four-point fixation. Theoretical advantages of four-point fixated IOLs include improved IOL centration and stability, reduced lens tilt, and potentially lower risk of long-term lens dislocation. Disadvantages include need for multiple sclerotomies and associated conjunctival disruption, risk of suture erosion and the potential for IOL opacification with some currently available hydrophilic lenses (e.g. Akreos AO60). In addition, four-point fixation can’t be used to re-use a dislocated three-piece IOL.
Four-point Haptic IOL Choice
Currently available PC-IOLs, which enables four-point fixation, includes the Akreos AO60 (Bausch and Lomb, North Clearwater, FL), PhysIOL MicroPure 1.2.3 and the enVista MX60 (Bausch and Lomb) (Figure 26.8.2.1). The Akreos AO60 and PhysIOL MicroPure 1.2.3 have four separate haptics, each with its own peripheral eyelet, for a true four-point fixation. The Akreos AO60 is composed of hydrophilic acrylic material, which can opacify when exposed to gas or oil, whereas the PhysIOL MicroPure 1.2.3 is hydrophobic. The enVista MX60 lens is made of hydrophobic acrylic material but only has two eyelets, which are located at the optic-haptic junction. Sutures need to be securely looped around the haptic to enable a pseudo-four point fixation. All these lenses are not designed to be sutured (off-label use) and breakage of the eyelets has been reported.
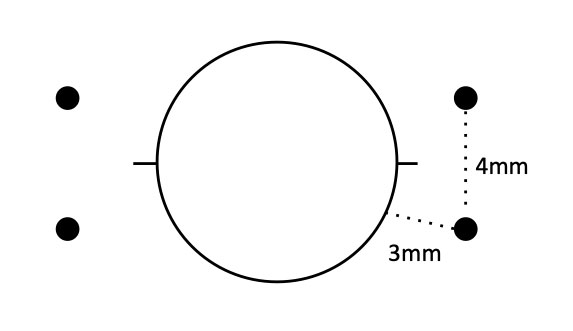
Use a corneal lens marker (e.g. toric marker) to mark the horizontal axis 180º apart. Mark the sclerotomy sites, which are located 3 mm posterior to the limbus and 4-5mm apart (Figure 26.8.2.2 and Figure 26.8.2.3).
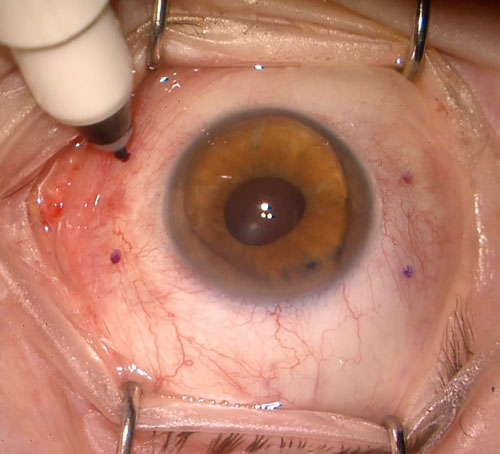
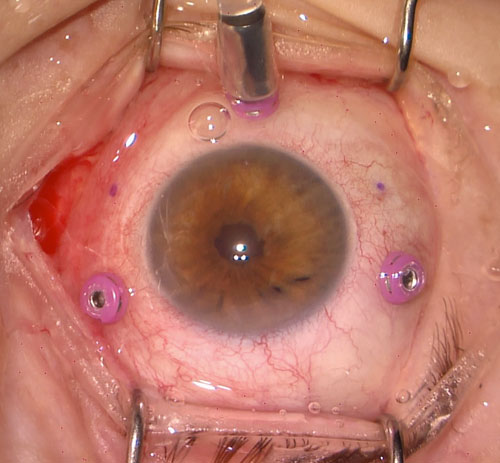
It is best to use 25 or 27-gauge valved cannulae for this procedure. Place the infusion line inferiorly away from the sclerotomy sites. Insert the two other cannulae at the superotemporal and superonasal marked sites using a perpendicular non-tunneled approach (Figure 26.8.2.4). If there are additional cannulae, these can be placed at the inferotemporal and inferonasal marks, but it is just as easy to introduce the suture through these sclerotomies using a needle (described below). Standard pars plana vitrectomy is then performed ensuring all anterior vitreous is removed especially around the sites of suture insertion. In the event of a large nose, the nasal suture can be moved superiorly and the temporal one moved inferiorly.
If there is retained lens material or a dislocated IOL that needs to be removed, this should be done first. See Chapters See Chapter 26.2 Pars Plana Lensectomy and Chapter 26.8.1 Scleral Sutured IOL- Traditional 2 Point Fixation.
Create a paracentesis and inject viscoelastic to protect endothelium. Use a 2.75mm keratome blade to create a clear corneal incision (CCI).
5. Pass the Suture Through the Eyelets of the IOL (Figures 26.8.2.5, 26.8.2.6 and 26.8.2.7)
Cut the 7-0 CV-8 Gore-Tex suture in half and remove the needles
For the Akreos AO60 lens, thread each half of the suture through the two eyelets on each side going from anterior-to-posterior through the first eyelet and posterior-to-anterior through the second eyelet to keep it sitting flat. The eyelet with the kidney bean shape should be oriented in the position closest to the left shoulder.
For the enVista MX60 lens, thread the suture anterior-to-posterior through the eyelet and loop anteriorly in front of haptic.
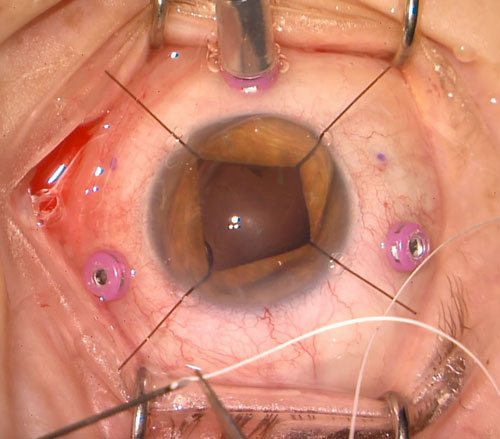
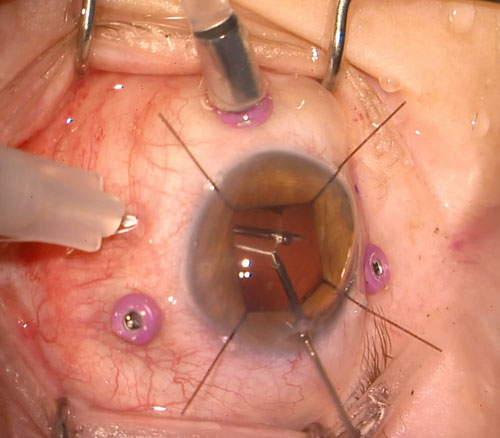
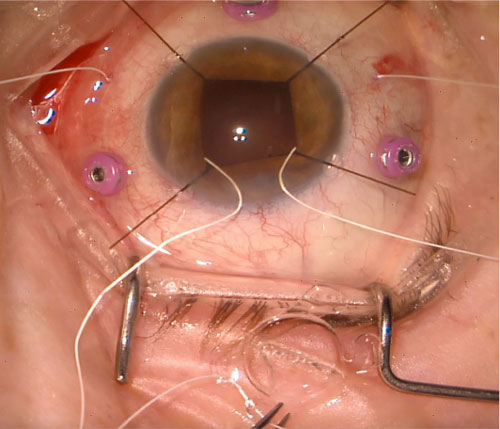
Consider marking the inferior sutures with a marking pen to better identify their position. Insert one end of the CV-8 Gore-Tex into the anterior chamber then pass it to forceps inserted through the pars plana to externalize it out of the sclera. Consider starting with the inferior temporal suture, then the superotemporal suture, and finally the inferonasal suture. If there is difficulty threading the nasal sclerotomies because of the nose, consider bending the forceps (Figure 26.8.2.8).
All rights reserved. No part of this publication which includes all images and diagrams may be reproduced, distributed, or transmitted in any form or by any means, including photocopying, recording, or other electronic or mechanical methods, without the prior written permission of the authors, except in the case of brief quotations embodied in critical reviews and certain other noncommercial uses permitted by copyright law.

Westmead Eye Manual
This invaluable open-source textbook for eye care professionals summarises the steps ophthalmologists need to perform when examining a patient.