26 Lens Management
26.1 Phaco-Vitrectomy
26.2 Pars Plana Lensectomy
26.3 Intraocular Lens Explantation
26.4 Secondary Intraocular Lens Insertion Clinical Scenarios & Clinical Decision Making
26.5 Sulcus Intraocular Lens
26.6 Anterior Chamber Intraocular Lens
26.7 Iris Fixated Intraocular Lenses
26.8.1 Scleral Sutured Intraocular Lens – Traditional 2 Point Fixation
26.8.2 Scleral Sutured Posterior Chamber Intraocular Lens 4 Point Fixation
26.8.3 Scleral Sutured Posterior Chamber Intraocular Lens – “Hoffman” Corneoscleral Pockets
26.8.4 Alternate Technique to Rescue a Dislocated IOL – Triangular Scleral Flap, Sutured IOL Technique
26.8.5 Suturing Without Exchanging the Intraocular Lens
26.9 Sutureless Scleral Fixation of an Intraocular Lens
26.6 Anterior Chamber Intraocular Lens
An anterior chamber IOL (AC-IOL) may be considered when there is inadequate capsular support in the setting of a normal iris and deep chamber.
Relative contraindications for AC-IOL:
- Corneal endothelial disease (e.g. Fuchs endothelial dystrophy)
- Iridocorneal angle damage (e.g. peripheral anterior synechiae)
- Shallow anterior chamber
- Lack of substantial iris tissue
Surgical planning for AC-IOL:
- Determine the AC-IOL diameter: measure horizontal limbal white-to-white length and add 1 mm
- AC-IOL will be about 2-3 fewer diopters lower power than a PC-IOL—the A constant of an AC-IOL takes this into account; if the IOL print out includes an AC-IOL, use that IOL power
Steps
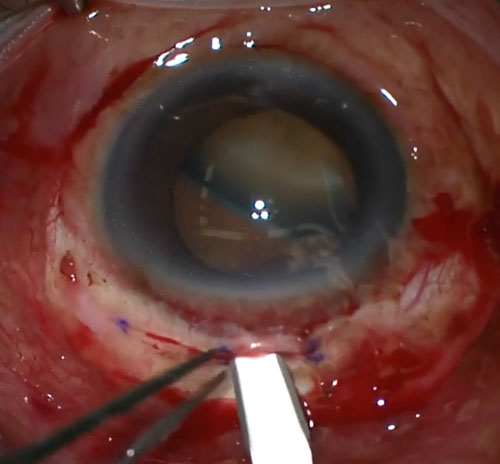
- Begin a scleral tunnel but do not enter the anterior chamber. A distance 1.5 to 2mm posterior to the limbus and 6-6.5mm wide is usually sufficient (Figure 26.6.1)
- Perform pars plana vitrectomy and IOL removal (if necessary) as described in previous chapters (Figure 26.6.2)
- Prior to AC-IOL insertion, inspect the fundus under wide-angle viewing for vitreous hemorrhage or choroidal detachments. Perform 360-degree scleral depression to look for retinal breaks (requiring endolaser)
- Inject intracameral viscoelastic prior to placement of the AC-IOL to minimize endothelial damage
- Enter the scleral tunnel
- The infusion may need to be temporarily switched off to avoid egress of viscoelastic from the anterior chamber. The infusion can be switched on and off by an assistant to maintain the intraocular pressure
- Pharmacologically constrict the pupil with intracameral acetylcholine chloride and consider inserting a lens glide. If used, it is important to avoid traumatizing the iris (Figure 26.6.3)
- Place the AC-IOL directly into the anterior chamber with Kelmann-McPherson or curved tying forceps. It is important that the haptics of the AC-IOL lie in the anterior chamber angle and do not pinch on iris or rub on the peripheral corneal endothelium (Figure 26.6.4)
- Using a Sinskey or Kuglen hook, lift each haptic in turn to ensure that it is free and rotate so the haptics lie horizontally
- Create a peripheral iridectomy with the vitrectomy cutter (or scissors) (Figure 26.6.5)
- Close the main corneal wound with 10-0 nylon
- If necessary close the sclerostomies with 7-0 vicryl
All rights reserved. No part of this publication which includes all images and diagrams may be reproduced, distributed, or transmitted in any form or by any means, including photocopying, recording, or other electronic or mechanical methods, without the prior written permission of the authors, except in the case of brief quotations embodied in critical reviews and certain other noncommercial uses permitted by copyright law.
Westmead Eye Manual
This invaluable open-source textbook for eye care professionals summarises the steps ophthalmologists need to perform when examining a patient.